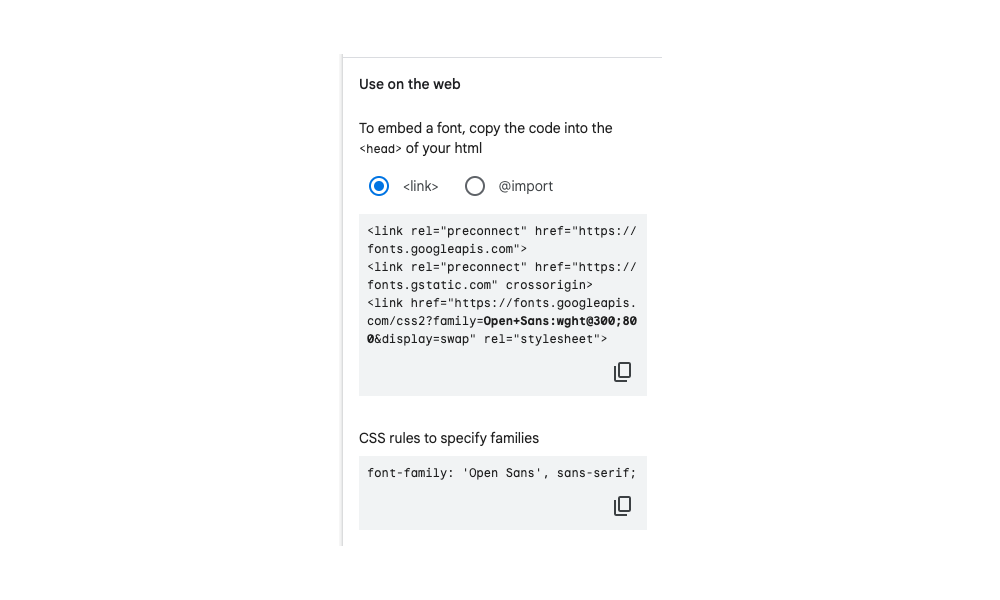
Unfortunately, if you drop this Google-generated code as-is into your website, you’ll find that the Variable font feature is not active, and only the Regular and the Bold weights are available. This is because the Google Fonts UI still generates this <link> code using the traditional font import convention.
<link href="https://fonts.googleapis.com/css2?family=Oswald:wght@200..700&display=swap" rel="stylesheet">
When you consult the Google documentation on loading variable fonts, you’ll see the updated syntax for calling a variable font is:
<link href="https://fonts.googleapis.com/css2?family=Open+Sans:wght@300..800&display=swap" rel="stylesheet">
This is almost the exact same syntax as what Google generated in our example, except for two key differences. The <link> that Google generated uses a single semicolon instead of the two periods between the minimum and maximum value. The other key difference is the range of values that we selected. To make the most use of any variable font, you should pick the minimum and maximum available weights.
So, the quickest and easiest way to get a working variable font is to select a font with at least one variable axis, select the minimum and maximum values, generate the <link> attribute, and then change the semicolon to two periods. One final caveat: if you are trying to include multiple fonts at a time, this will jumble the syntax and make it harder to make that quick change to get it to work. For instance, if we add Montserrat to our font selections, the Google-generated <link> will look like this:
<link href="https://fonts.googleapis.com/css2?family=Montserrat:ital,wght@0,100;1,900&family=Open+Sans:wght@300;800&display=swap" rel="stylesheet">
The quick way to get around this is to import the two links separately.
<link href="https://fonts.googleapis.com/css2?family=Open+Sans:wght@300..800&display=swap" rel="stylesheet">

<link href="https://fonts.googleapis.com/css2?family=Montserrat:wght@100..900&display=swap" rel="stylesheet">


