Deploying Jekyll to Github Pages with Travis and Gulp

Anne Tomasevich

Anne Tomasevich —

Jekyll infographic

Since our company’s inception, we at Savas Labs have used Jekyll to build our company website and GitHub Pages to host it with great success. Jekyll is a powerful tool out of the box, and it’s hard to imagine a simpler hosting strategy than GitHub Pages, which only requires a specifically named branch and a single settings update to get your site live for free. Although we often use Drupal to build complex, data-heavy systems that need to have a simple workflow for site admins, for our own site we recognized that Jekyll was a better tool for our workflow that would mitigate security risks, eliminate site hosting costs, and reduce complexity since there’s no need for a database back-end.

One well-known limitation of this workflow: any Jekyll plugins not whitelisted by GitHub Pages will be disabled when GitHub Pages builds the site, since jekyll build is run with the --safe tag. We recently wanted to start using the Jekyll Picture Tag plugin (read about why), and the incredibly crucial Jemoji plugin ?, so we needed to find a way to build our site before pushing it to GitHub Pages for deployment. To complicate matters a bit more, we recently starting building our site with gulp, which introduced another layer of dependencies to the mix.

Many solutions exist for building the site before pushing to GitHub Pages. We chose to use Travis CI to run our gulp command to build the site, then commit the changes to our master branch so GitHub Pages will deploy the updated site.

RELATED READ

Optimizing Jekyll Performance with Gulp

Basic workflow

Our site was already using Travis CI to run our test script on pull requests and merges to the master branch. You can learn about setting up Travis in their docs.

Previously, Travis would build the site and run our tests, then we would merge branches into master, triggering GitHub Pages to rebuild and deploy our site.

Diagram of original deployment workflow
Original deployment workflow

Now, we want to build our site before it gets to GitHub Pages to ensure our Jekyll Plugins are included. In our new workflow:

  1. We created a new default branch so the master branch can be cleared out and used by Travis.
  2. When this new branch is updated (i.e. a pull request is merged), Travis builds the site.
  3. Using a GitHub token for authorization, Travis commits the _site directory to the master branch, then pushes the master branch.
  4. This triggers GitHub Pages to deploy our pre-built site.
Diagram of new deployment workflow
New deployment workflow

Create a new default branch

We created a new branch off master called source and set it to the default branch on GitHub. source contains what the master branch used to — the Jekyll config file(s), HTML files and partials, data files, styles and JS, etc. Each time the deploy process is run, Travis deletes all the files on the master branch, then commits the entire compiled _site directory. So, the master branch only contains the compiled site, which is deployed by GitHub Pages.

Why delete all files on master before committing the _site directory? This ensures that all changes (including deletions) are captured in each deployment.

Set up a GitHub token for Travis

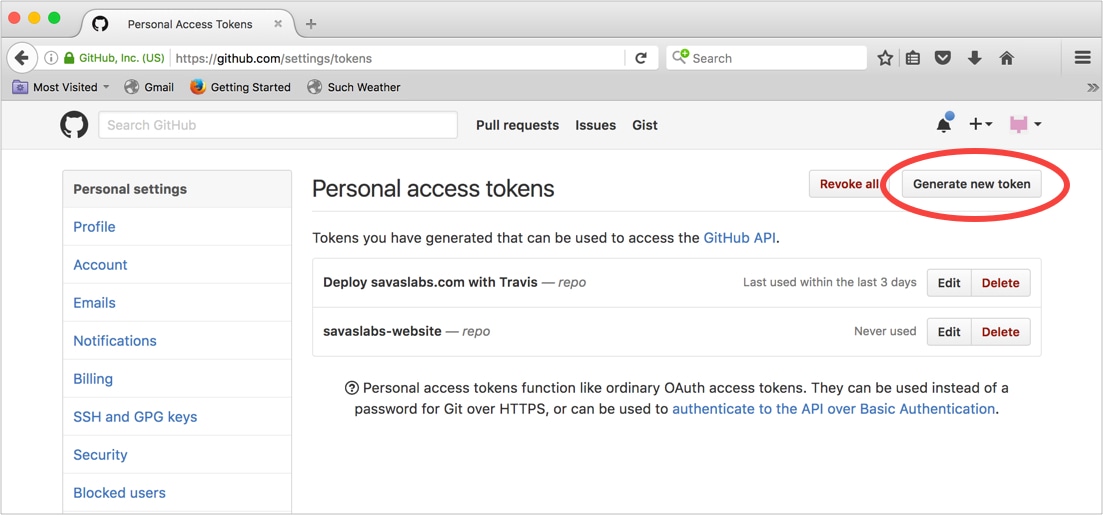
To give Travis the authority to commit and push to our repository, we generated a personal access token by visiting the settings page on GitHub and generating a new token. We used a bot account that has access to our repository to avoid needing to use one of our personal accounts.

Generating a personal access token in GitHub

We’ll need to use the access token and the account’s email address in our deployment script, so to keep those items out of version control we used travis encrypt:

$ travis encrypt GH_TOKEN=<token> --add env.global
$ travis encrypt GH_EMAIL=<email> --add env.global


This adds encrypted versions of these sensitive items to .travis.yml:

env:
  global:
  - secure: [big long encrypted string...]
  - secure: [...and another]

Configure deployment

Next, we added the following to our .travis.yml file:

# Keep Travis from testing `master` branch
branches:
  except:
  - master

# Deployment config
deploy:
  provider: script
  script: "./_scripts/build.sh"
  skip_cleanup: false
  on:
    branch: source


We don’t want Travis running the test script on the master branch anymore since it only contains the compiled site, and we only want Travis to run the deployment script on the source branch. We’re also telling Travis which script to run on deployment, and to destroy the site after the test script is run with our _config.test.yml file so the deployment script can rebuild the site with our default _config.yml file. Check out this revision of the full .travis.yml file here.

That revision of .travis.yml worked for us when we were using jekyll build to compile the site, but things got trickier when we started using gulp. We had to set the proper versions of npm and node.js and ensure that our ruby gems were installed properly. Here’s the full Travis config we needed to get things running with gulp:

# .travis.yml

language: node_js
sudo: required
script:
  - ./_scripts/run-tests.sh
branches:
  except:
  - master
node_js:
 - '6.1'
before_install:
  - if [[ `npm -v` != 3* ]]; then npm i -g npm@3; fi
  - rvm install 2.1
  - rvm use 2.1
  - . $HOME/.nvm/nvm.sh && nvm install 6.1 && nvm use 6.1
  - gem install bundler
  - bundle check || bundle install
env:
  global:
  - NOKOGIRI_USE_SYSTEM_LIBRARIES=true
  - secure: [stuff]
  - secure: [more stuff]
deploy:
  provider: script
  script: "./_scripts/build.sh"
  skip_cleanup: false
  on:
    branch: source


Or view it on GitHub.

The deployment script

When the source branch is updated and our tests pass, the deployment script build.sh is executed.

#!/bin/bash

# Enable error reporting to the console.
set -e

# Install bundles if needed.
bundle check || bundle install

# NPM install if needed.
. $HOME/.nvm/nvm.sh && nvm install 6.1 && nvm use 6.1
npm install

# Build the site.
gulp

# Checkout `master` and remove everything.
git clone https://${GH_TOKEN}@github.com/savaslabs/savaslabs.github.io.git ../savaslabs.github.io.master
cd ../savaslabs.github.io.master
git checkout master
rm -rf *

# Copy generated HTML site from source branch in original repository.
# Now the `master` branch will contain only the contents of the _site directory.
cp -R ../savaslabs.github.io/_site/* .

# Make sure we have the updated .travis.yml file so tests won't run on master.
cp ../savaslabs.github.io/.travis.yml .
git config user.email ${GH_EMAIL}
git config user.name "savas-bot"

# Commit and push generated content to `master` branch.
git status
git add -A .
git status
git commit -a -m "Travis #$TRAVIS_BUILD_NUMBER"
git push --quiet origin `master` > /dev/null 2>&1


Some important notes:

  • Make sure the script file is executable!
  • The last line ensures that our encrypted token won’t end up in git logs.

Deployment and debugging

Merging this code into source was the easiest way for us to test if our new process worked — scary, right? Fortunately, if the build script failed (and it did several times until we could get the npm and node versions correct and the ruby gems installing properly) nothing got pushed to master so nothing was deployed, meaning no downtime on our site.

We also used Teleconsole to debug from inside the Travis environment. To do this, we commented out the git push line and added the following to build.sh:

curl https://www.teleconsole.com/get.sh | sh
teleconsole


This printed a session ID in the Travis CI output. With a couple of commands, we could enter the session from our local machines:

# Install teleconsole
$ curl https://www.teleconsole.com/get.sh | sh

# Join session
$ teleconsole join [session ID]


Being able to look around and run commands within the Travis environment was hugely helpful!

RELATED READ

Lightning Talks - Three Useful Additions to Any Developer Toolbox in Q1 2017

Future work

We’d like to implement some improvements on this process in the future:

  • With our current setup, we can’t deploy when our tests are failing.
  • Providing consistency with Ruby and Node dependencies across different operating systems and environments has proven difficult. We’ve considered Dockerizing our site but that’s a subject for another post!

Resources

We’d like to give credit to these helpful posts, which we adapted for our site: