Below is an outline of the gulp tasks we’ll be writing. From here, I’ll go through each individual task, then the default gulp and gulp serve
// gulpfile.js

// Processes SCSS.
gulp.task('build:styles:main', function() {
  // Compile SCSS, run autoprefixer, and minify CSS.
});

// Creates critical CSS file.
gulp.task('build:styles:critical', function() {
  // Compile critical SCSS rules, run autoprefixer, minify CSS, and place in
  // appropriate location so it can be inlined in the HTML head.
});

// Processes JS.
gulp.task('build:scripts', function() {
  // Concatenate and uglify JS.
});

// Optimizes images.
gulp.task('build:images', function() {
  // Run imagemin.
});

// Runs jekyll build command.
gulp.task('build:jekyll', function() {
  // Run bundle exec jekyll build with appropriate config file.
});

// Builds site anew.
gulp.task('build', function() {
  // Run all build tasks.
});

// Default Task: builds site.
gulp.task('default', ['build']);

// Serves site and watches files.
gulp.task('serve', ['build'], function() {
  // Watch for changes and run appropriate build tasks when needed.
});
Handle CSS
Jekyll compiles SCSS out of the box, but using gulp to process our SCSS gives us the power to do other useful things like minify our CSS, add vendor prefixes, and direct our critical CSS to the <head> element.
Process all SCSS
// Uses Sass compiler to process styles, adds vendor prefixes, minifies, then
// outputs file to the appropriate location.
gulp.task('build:styles:main', function() {
    return sass(paths.sassFiles + '/main.scss', {
        style: 'compressed',
        trace: true,
        loadPath: [paths.sassFiles]
    }).pipe(postcss([ autoprefixer({ browsers: ['last 2 versions'] }) ]))
        .pipe(cleancss())
        .pipe(gulp.dest(paths.jekyllCssFiles))
        .pipe(gulp.dest(paths.siteCssFiles))
        .pipe(browserSync.stream())
        .on('error', gutil.log);
});
This task will output main.css in _site/assets/styles.
Some notes:
- We’re including all our SCSS partials in our main.scss file, but you could point to a directory or file glob if needed.
- We’re using the autoprefixer plugin for postcss. We’re making heavy use of the Bourbon mixin library which currently handles some autoprefixing, but this will be dropped (hopefully soon!) in Bourbon v5.0 at which time autoprefixer will be recommended.
Critical CSS
Placing the CSS that’s critical to above-the-fold content in <style> tags in the HTML <head> to means our end user can avoid waiting on the server to load the full CSS file on the initial page load. Identifying critical styles and pulling them into a single file may seem daunting but there are a number of ways to do this automatically. However, we found the easiest way to consolidate critical styles for all pages on our site was to follow Chris Ferdinandi’s method and separate critical styles into their own Sass partials, then include these partials in a critical.scss file. This took a little refactoring, but it certainly didn’t hurt to make our Sass files even more modular.
After we created our critical.scss file, we added another gulp task to process it:
// Processes critical CSS, to be included in head.html.
gulp.task('build:styles:critical', function() {
    return sass(paths.sassFiles + '/critical.scss', {
        style: 'compressed',
        trace: true,
        loadPath: [paths.sassFiles]
    }).pipe(postcss([ autoprefixer({ browsers: ['last 2 versions'] }) ]))
        .pipe(cleancss())
        .pipe(gulp.dest('_includes'))
        .on('error', gutil.log);
});
This outputs a (git-ignored) critical.css file into our _includes directory. We added the critical CSS file to our head.html template:
{# in head.html #}
<head>

  {# Other stuff... #}

  <style>{% include critical.css %}</style>

</head>
Load CSS asynchronously
Next, instead of loading the main CSS file all at once, we used Filament Group’s loadCSS function to load the main CSS asynchronously (plus our Google fonts):
{# in head.html #}
<head>

  {# Other stuff... #}

  <script>
    !function(e){"use strict";var t=function(t,n,r){function o(e){return i.body?e():void setTimeout(function(){o(e)})}function l(){d.addEventListener&&d.removeEventListener("load",l),d.media=r||"all"}var a,i=e.document,d=i.createElement("link");if(n)a=n;else{var s=(i.body||i.getElementsByTagName("head")[0]).childNodes;a=s[s.length-1]}var u=i.styleSheets;d.rel="stylesheet",d.href=t,d.media="only x",o(function(){a.parentNode.insertBefore(d,n?a:a.nextSibling)});var f=function(e){for(var t=d.href,n=u.length;n--;)if(u[n].href===t)return e();setTimeout(function(){f(e)})};return d.addEventListener&&d.addEventListener("load",l),d.onloadcssdefined=f,f(l),d};"undefined"!=typeof exports?exports.loadCSS=t:e.loadCSS=t}("undefined"!=typeof global?global:this),function(e){if(e.loadCSS){var t=loadCSS.relpreload={};if(t.support=function(){try{return e.document.createElement("link").relList.supports("preload")}catch(t){}},t.poly=function(){for(var t=e.document.getElementsByTagName("link"),n=0;n<t.length;n++){var r=t[n];"preload"===r.rel&&"style"===r.getAttribute("as")&&(e.loadCSS(r.href,r),r.rel=null)}},!t.support()){t.poly();var n=e.setInterval(t.poly,300);e.addEventListener&&e.addEventListener("load",function(){e.clearInterval(n)})}}}(this);
    loadCSS('/assets/styles/main.css');
    loadCSS('https://fonts.googleapis.com/css?family=Roboto+Condensed:400,700,400italic,700italic|PT+Serif|Source+Sans+Pro');
  </script>

  <style>{% include critical.css %}</style>

</head>
As a fallback, we’re loading the CSS files normally in <noscript> tags in a scripts.html template that’s included on each page after the footer.
{# in scripts.html #}
<noscript>
  <link href='/assets/styles/main.css' rel='stylesheet' type='text/css'>
  <link href='https://fonts.googleapis.com/css?family=Roboto+Condensed:400,700,400italic,700italic|PT+Serif|Source+Sans+Pro' rel='stylesheet' type='text/css'>
</noscript>
Tasks to build all styles and delete all styles
To wrap things up, we have a task to build all styles, and a task to delete all styles. These will come into play when we set up our main build and serve tasks.
// Builds all styles.
gulp.task('build:styles', ['build:styles:main', 'build:styles:critical']);

// Deletes CSS.
gulp.task('clean:styles', function(callback) {
    del([paths.jekyllCssFiles + 'main.css',
        paths.siteCssFiles + 'main.css',
        '_includes/critical.css'
    ]);
    callback();
});
Process JS and load it asynchronously
// Concatenates and uglifies global JS files and outputs result to the
// appropriate location.
 gulp.task('build:scripts', function() {
     return gulp.src([
         paths.jsFiles + '/global/lib' + paths.jsPattern,
         paths.jsFiles + '/global/*.js'
     ])
         .pipe(concat('main.js'))
         .pipe(uglify())
         .pipe(gulp.dest(paths.jekyllJsFiles))
         .pipe(gulp.dest(paths.siteJsFiles))
         .on('error', gutil.log);
 });
This task outputs main.js to _site/assets/js/main.js. To avoid delaying the initial render, we’re loading the scripts asynchronously via the async attribute in our scripts.html template included on each page after the footer.
{# in scripts.html #}
<script type="text/javascript" src="https://savaslabs.com/assets/js/main.js" async></script>
<noscript>
  <link href='/assets/styles/main.css' rel='stylesheet' type='text/css'>
  <link href='https://fonts.googleapis.com/css?family=Roboto+Condensed:400,700,400italic,700italic|PT+Serif|Source+Sans+Pro' rel='stylesheet' type='text/css'>
</noscript>
As before, we also have a task to delete all processed scripts.
// Deletes processed JS.
gulp.task('clean:scripts', function(callback) {
    del([paths.jekyllJsFiles + 'main.js', paths.siteJsFiles + 'main.js']);
    callback();
});
Copy fonts
I’ll quickly note that we set up a task to copy our fonts to the appropriate directory, but we’re only doing this with Font Awesome at the moment.
// Copies fonts.
gulp.task('build:fonts', ['fontawesome']);

// Places Font Awesome fonts in proper location.
gulp.task('fontawesome', function() {
    return gulp.src(paths.fontFiles + '/font-awesome/**.*')
        .pipe(rename(function(path) {path.dirname = '';}))
        .pipe(gulp.dest(paths.jekyllFontFiles))
        .pipe(gulp.dest(paths.siteFontFiles))
        .pipe(browserSync.stream())
        .on('error', gutil.log);
});

// Deletes processed fonts.
gulp.task('clean:fonts', function(callback) {
    del([paths.jekyllFontFiles, paths.siteFontFiles]);
    callback();
});
Process images
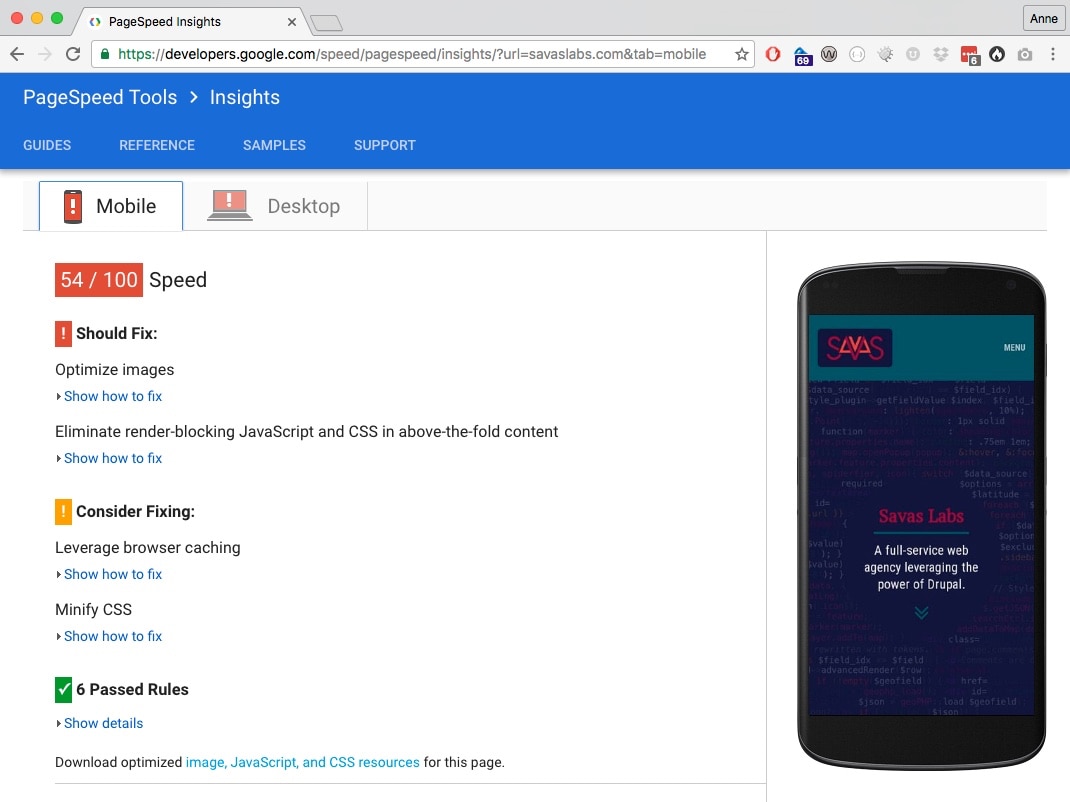
We took a few steps to optimize our site’s existing images and ensure that future images could be optimized automatically via gulp and the Jekyll build process.
Manual updates to images
We knocked out some low-hanging fruit by ensuring we were using the proper image formats and the smallest images possible. Google has a great writeup on image optimization that I’d highly recommend reading, but the gist is:
- Don’t use images if you can use CSS or webfonts
- Choose the right image format:
- If it’s a vector graphic or can be converted to one, use SVG
- If you need transparency or fine detail, use PNG
- If you need animation, use GIF
- Otherwise, use JPEG
- Play around with image quality to find the lowest quality that still looks great
- Your images shouldn’t be any larger than the largest they’ll display on your site (keeping in mind this might be 2x for high resolution displays)
On my Mac, I used Sketch to convert some of our images from PNG to JPEG at a slightly lower quality, to save vector graphics as SVGs when possible, and to trim images down when they were larger than they needed to be. We also established these rules as a team for future images to be added to our site.
Minify images via gulp
Next, we wrote a gulp task to run our images through the imagemin plugin.
// Optimizes and copies image files.
gulp.task('build:images', function() {
    return gulp.src(paths.imageFilesGlob)
        .pipe(imagemin())
        .pipe(gulp.dest(paths.jekyllImageFiles))
        .pipe(gulp.dest(paths.siteImageFiles))
        .pipe(browserSync.stream());
});
This task outputs optimized images in _site/assets/img.
We also have a task to delete all processed images.
// Deletes processed images.
gulp.task('clean:images', function(callback) {
    del([paths.jekyllImageFiles, paths.siteImageFiles]);
    callback();
});
Jekyll Picture Tag plugin
Between our manual updates and imagemin, we cut our image sizes down drastically! Our next step was to set up the Jekyll Picture Tag plugin. This plugin supplies a Liquid tag to insert a <picture> element, which allows the browser to choose the most appropriate image from an array of sizes. Since our sites are viewed on so many different devices, we need to send these devices images that make sense — loading a huge image meant for a large retina screen on a tiny mobile phone is a waste of time and resources. The Liquid tag provided by the plugin is much simpler than typing out all the <picture> markup, and the plugin also generates the differently sized images based on some simple config. Since the <picture> element has very low browser support at this time, Picturefill is used as a polyfill, meaning the resulting markup will work in all modern browsers.
But wait - how can we use a Jekyll plugin while we’re hosting our site on GitHub Pages? GitHub Pages only allows a few Jekyll plugins when it builds a site for deployment, a well-known limitation. Read about how we’re using Travis CI to build our site for testing and deployment to GitHub Pages so we can use Jekyll plugins.
The installation and usage documentation on Jekyll Picture Tag’s GitHub repo is great, and setup is a quick matter of installing the gem and the Picturefill script. From there, we set up presets for repeated image styles on our site - team photos, featured blog images, etc.
# in config.yml
# Picture element presets
picture:
  source: "assets/img"
  output: "assets/processed-img"
  markup: "picture"
  presets:
    team_square:
      attr:
        class: "image--team-square"
        itemprop: "image"
      ppi: [1, 2]
      source_400:
        media: "(min-width: 400px)"
        width: "334"
      source_default:
        width: "254"
    team_individual:
      attr:
        class: "image--team-individual"
        itemprop: "image"
      ppi: [1, 2]
      source_400:
        media: "(min-width: 400px)"
        width: "350"
      source_default:
        width: "288"
    team_post_meta:
      attr:
        class: "image--team-post-meta"
        itemprop: "image"
      ppi: [1, 2]
      source_default:
        width: "288"
    case_study:
      attr:
        class: "image--case-study"
        itemprop: "image"
      ppi: [1, 2]
      source_860:
        media: "(min-width: 860px)"
        width: "560"
      source_640:
        media: "(min-width: 640px)"
        width: "430"
      source_400:
        media: "(min-width: 400px)"
        width: "560"
      source_default:
        width: "400"
    post_featured_image:
      attr:
        class: "image--post-featured-image"
        itemprop: "image"
      ppi: [1, 2]
      source_1120:
        media: "(min-width: 400px)"
        width: "737"
      source_default:
        width: "400"
First we set the source directory to assets/img, which is where images are sent by gulp after being optimized. Resized images will be output to assets/processed-img. Keep in mind that since this is being done during the jekyll build_site directory.
Each preset has the following configured:
- A BEM-style class (other attributes can be added too).
- An array of resolutions.
[1, 2] will generate images at 1 and 2 times the specified dimensions, and the double-sized image will be served on devices with a resolution of at least 2 dots per pixel (better known as Retina screens).
- Source specifications. Each source contains a media query and a width to be used at that screen size (I didn’t include height so the images will be scaled proportionally).
From here we use a simple Liquid tag to create the markup. For our individual team member pages we insert the team member’s photo with:
{% picture team_individual {{ page.photo }} alt="{{ page.name }}" %}
We’re using the team_individual preset, so four versions of the image will be created (two at each specified width, and two images at double those dimensions for hi-res displays). The markup ends up like this:
<picture>
  <source srcset="/assets/processed-img/team/anne-tomasevich-700by710-eeafb6.jpg" media="(min-width: 400px) and (-webkit-min-device-pixel-ratio: 2), (min-width: 400px) and (min-resolution: 192dpi)">
  <source srcset="/assets/processed-img/team/anne-tomasevich-350by355-eeafb6.jpg" media="(min-width: 400px)">
  <source srcset="/assets/processed-img/team/anne-tomasevich-576by584-eeafb6.jpg" media="(-webkit-min-device-pixel-ratio: 2), (min-resolution: 192dpi)">
  <source srcset="/assets/processed-img/team/anne-tomasevich-288by292-eeafb6.jpg">
  <img src="/assets/processed-img/team/anne-tomasevich-288by292-eeafb6.jpg" class="image--team-individual" itemprop="image" alt="Anne Tomasevich">
</picture>
With some easy setup, we’re cutting down drastically on the sizes of images served at smaller screen sizes and lower resolutions!
Background images
One place we couldn’t use this plugin is for images displayed via the CSS background-image property, which we’re using for some hero images. For the large image on the home page, I manually created a variety of images (known in the responsive image world as art direction) then used media queries to display the appropriate image as the background image. You can check out the SCSS on GitHub. Since this is a much more time-consuming process I haven’t implemented this for all of our background images yet, but taking the time to create images that will look exactly how we want them at all screen sizes will be well worth it!
Build and serve tasks
To pull it all together, we have a default task to build the site (creating the _site directory which holds the compiled HTML, CSS, JS, and images that comprise our site) and a serve task to watch our files and rebuild the appropriate files or the entire site when those files change.
The default task deletes the site by running the clean tasks then runs all the build tasks, then the jekyll build command to build the site using our processed assets.
A little gulp tip: tasks passed within square brackets are run concurrently (one of the major advantages of using gulp over Grunt, which can only run one task at a time), while items in a comma-separated list are run sequentially. We’ll need this to run the build tasks in the correct order since we need to create our assets directory before running build:jekyll, which will copy assets to _site/assets.
// Runs jekyll build command.
gulp.task('build:jekyll', function() {
    var shellCommand = 'bundle exec jekyll build --config _config.yml';

    return gulp.src('')
        .pipe(run(shellCommand))
        .on('error', gutil.log);
});

// Deletes the entire _site directory.
gulp.task('clean:jekyll', function(callback) {
    del(['_site']);
    callback();
});

// Main clean task.
// Deletes _site directory and processed assets.
gulp.task('clean', ['clean:jekyll',
    'clean:fonts',
    'clean:images',
    'clean:scripts',
    'clean:styles']);

// Builds site anew.
gulp.task('build', function(callback) {
    runSequence('clean',
        ['build:scripts', 'build:images', 'build:styles', 'build:fonts'],
        'build:jekyll',
        callback);
});

// Default Task: builds site.
gulp.task('default', ['build']);
Now, gulp will run the default task build and will build the _site directory. This is what we want in production, but let’s go back to our three separate Jekyll configuration files. We want to create gulp tasks using config.test.yml for running our test script and config.dev.yml for local development.
// Runs jekyll build command using test config.
gulp.task('build:jekyll:test', function() {
    var shellCommand = 'bundle exec jekyll build --config _config.yml,_config.test.yml';

    return gulp.src('')
        .pipe(run(shellCommand))
        .on('error', gutil.log);
});

// Runs jekyll build command using local config.
gulp.task('build:jekyll:local', function() {
    var shellCommand = 'bundle exec jekyll build --config _config.yml,_config.test.yml,_config.dev.yml';

    return gulp.src('')
        .pipe(run(shellCommand))
        .on('error', gutil.log);
});
The last thing we needed is a gulp command to serve the site and watch for file changes. To accomplish this we’re using gulp.watch(), which tells gulp to run a specified task if the targeted files are changed. We also created a couple of special tasks to tell the browser to reload the served site on changes to Jekyll files (templates, config, etc.) or JavaScript files. We already included .pipe(browserSync.stream()) in our build:styles:main and build:images tasks, so when these files are updated the changes will be injected into our local site and we won’t even need a refresh.
// Special tasks for building and then reloading BrowserSync.
gulp.task('build:jekyll:watch', ['build:jekyll:local'], function(callback) {
    browserSync.reload();
    callback();
});

gulp.task('build:scripts:watch', ['build:scripts'], function(callback) {
    browserSync.reload();
    callback();
});

// Static Server + watching files.
// Note: passing anything besides hard-coded literal paths with globs doesn't
// seem to work with gulp.watch().
gulp.task('serve', ['build:local'], function() {

    browserSync.init({
        server: paths.siteDir,
        ghostMode: false, // Toggle to mirror clicks, reloads etc. (performance)
        logFileChanges: true,
        logLevel: 'debug',
        open: true        // Toggle to automatically open page when starting.
    });

    // Watch site settings.
    gulp.watch(['_config.yml'], ['build:jekyll:watch']);

    // Watch .scss files; changes are piped to browserSync.
    gulp.watch('_assets/styles/**/*.scss', ['build:styles']);

    // Watch .js files.
    gulp.watch('_assets/js/**/*.js', ['build:scripts:watch']);

    // Watch image files; changes are piped to browserSync.
    gulp.watch('_assets/img/**/*', ['build:images']);

    // Watch posts.
    gulp.watch('_posts/**/*.+(md|markdown|MD)', ['build:jekyll:watch']);

    // Watch drafts if --drafts flag was passed.
    if (module.exports.drafts) {
        gulp.watch('_drafts/*.+(md|markdown|MD)', ['build:jekyll:watch']);
    }

    // Watch html and markdown files.
    gulp.watch(['**/*.+(html|md|markdown|MD)', '!_site/**/*.*'], ['build:jekyll:watch']);

    // Watch RSS feed XML file.
    gulp.watch('feed.xml', ['build:jekyll:watch']);

    // Watch data files.
    gulp.watch('_data/**.*+(yml|yaml|csv|json)', ['build:jekyll:watch']);

    // Watch favicon.png.
    gulp.watch('favicon.png', ['build:jekyll:watch']);
});
With this, we can run gulp serve to fire up our site locally. The initial build takes a bit longer than jekyll serve but the convenience of automatically opening a browser window, automatic refreshing, and new CSS being injected is fantastic!