Strategies and Tools for Resolving Git Merge Conflicts

Dan Murphy on background

Dan Murphy

screenshot of git merge output in terminal

If you use Git for version control and you collaborate frequently, then you are bound to run into merge conflicts from time to time.

In an ideal world you merge changes to production (or other relevant upstream updates) into your parallel feature work frequently, and the conflicts are relatively minor and straightforward to resolve.

However, from time to time branches diverge significantly and merging them back together takes time and a solid understanding of why each branch may have modified the same hunks of code.

In this post I’m going to review the strategies and tools I like to use when resolving complicated merge conflicts.

What is merging?

There are many good online tutorials that cover Git merging, so I’ll just review the basics. If you’re already fluent in Git, feel free to skip to the strategies and tools section.

As Atlassian’s branching tutorial explains “Merging is Git’s way of putting a forked history back together again.”

A Git merge is run via the command git merge <target_branch>. When merging, Git always merges into the current branch. The branch being merged (aka the target branch) will not be affected.

There are two types of merges: fast-forward merges and 3-way merges.

Fast forward merges occur when the tip of the current branch is a direct ancestor of the target branch. In this case, instead of actually merging the branches, Git simply moves (or fast forwards) the current branch tip up to the target branch tip.

However, a fast-forward merge is not possible if the branches have diverged. In those cases, a 3-way merge is required, which uses a dedicated commit to bring together the two histories.

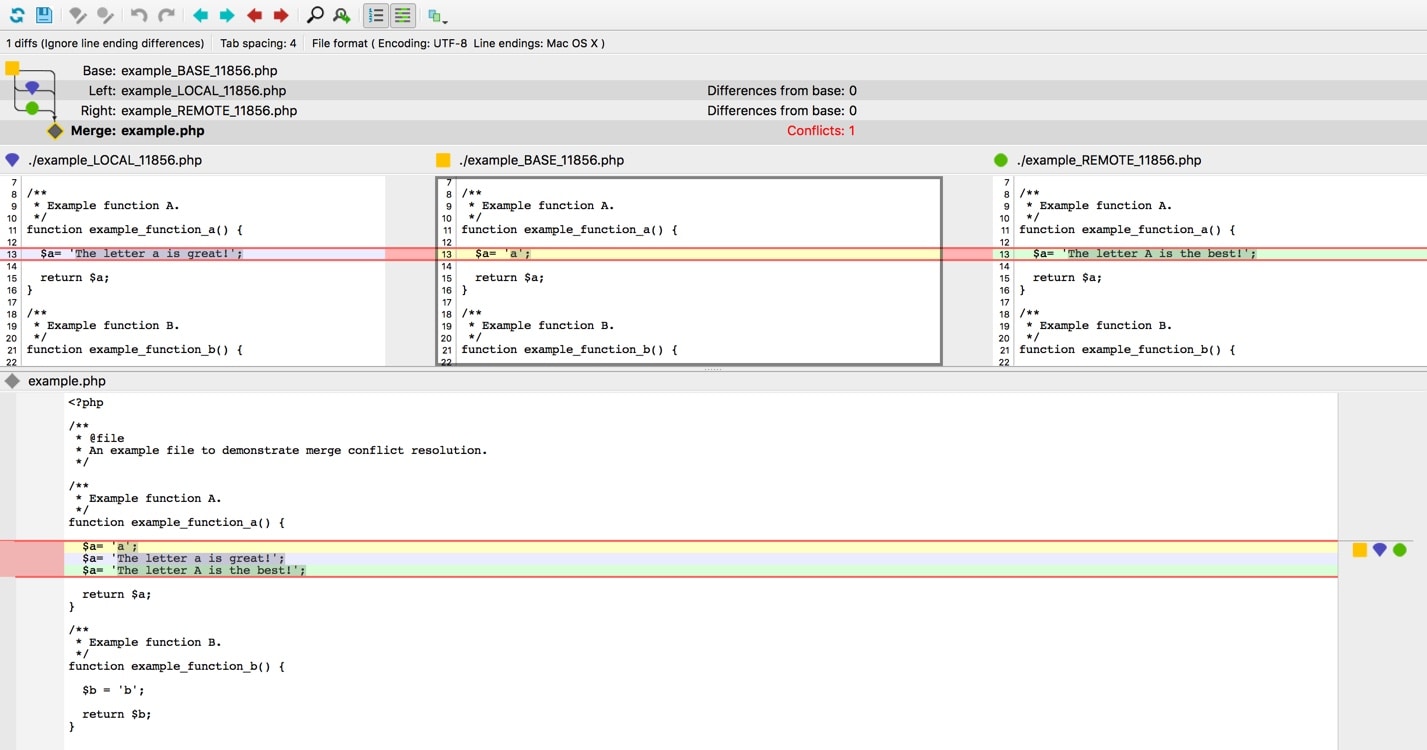
In a three way merge, Git’s merge algorithm uses the current branch, the target branch, and their merge base in order to incorporate changes from the target branch into the current branch. The merge base is essentially the most recent common ancestor (often this is the commit before the two branches forked). Git uses the merge base to identify what changed since the branches diverged.

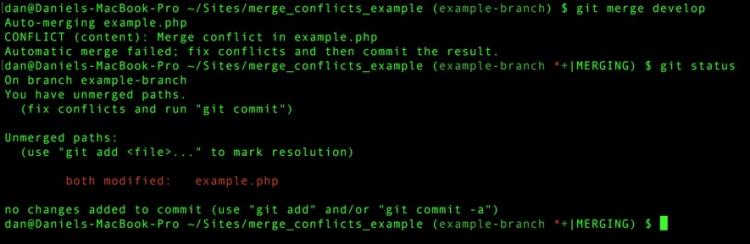
Git is smart, and non-overlapping changes (areas of code modified by one branch but not that other) are automatically incorporated into the final merged result. However, sometimes both branches change the same part of the same file, resulting in merge conflicts.

Merge conflicts

If your branch and the target branch both changed the same part of the same file, then Git won’t be able to merge them cleanly. Each of these discrepancies results in a merge conflict.

In these cases, Git leaves the changes made by both your branch and the target (separated by special conflict markers) and notifies you that there was a conflict.

To complete the merge you must then resolve each of these conflicts by explicitly telling Git what you’d like the post-merged file to include at these locations. To do so use the following commands:

  • git status shows you which files need to be resolved.
  • git add on a conflicted file(s) tells Git the conflicts are resolved.
  • git commit generates the merge commit completing the merge.

Strategies and tools

First of all, you should always make sure your working directory is clean before merging. If you have work in progress, either commit it to a temporary branch or stash it. This allows you to easily abandon your merge at any point without losing any of your work. You can abort an in-progress merge using the git merge --abort command.

If the merge results in conflicts, I start by finding the merge base using the git merge-base <tareget_branch> <current_branch> command. As mentioned previously, the merge base is essentially the commit before the two branches forked.

I then inspect the development history (since the branches diverged) for each file with merge conflicts. This helps me better understand (or simply remember!) each branch’s intent when modifying the file.

I find that the most powerful command for this inspection is git log --follow -p -- file, which shows the history of the file (including the history beyond renames) with diffs for each commit. To inspect both the target branch and the current branch since they diverged (i.e. since the merge base), I use the following commands respectively:

  • git log <merge-base-sha> <target-branch> --follow -p -- path/to/file
  • git log <merge-base-sha> HEAD --follow -p -- path/to/file

In this case HEAD is just a shorthand for the pre-merge state of the current branch.

Sometimes, I find it easier to omit the -p option in the previous commands, and instead just review the entire diff for both the target branch and the current branch since they diverged:

  • git diff <merge-base-sha> <target-branch> -- path/to/file
  • git diff <merge-base-sha> HEAD -- path/to/file

Ultimately, reviewing this history helps me better understand what each branch was trying to accomplish. With this information in hand, I can then manually resolve the merge conflicts by deciding what code each of these files should include post merge.

Visual merge tools

In addition to these strategies, I find that it is also helpful to use a visual merge tool when resolving merge conflicts.

With these tools, you don’t need to sift through Git conflict markers. Rather, visual merge tools provide a GUI that allows you to compare the different versions of the files you are merging, and they provide point and click tools to help you find and resolve conflicts.

A good visual merge tool will display at least 3 panels for each file with conflicts. There will be a panel showing the version of that file:

  • In your branch
  • In the target branch
  • As it will appear after merging

I prefer merge tools (such as the P4Merge tool shown below) which also include a fourth display panel showing the version of that file in the merge base:

P4Merge tool screenshot

There are many visual merge tools to choose from, some of which may already be installed on your system.

To view the list of available merge tools along with other valid but uninstalled merge tools, type git mergetool --tool-help in your terminal.

If your merge results in conflicts, you can type git mergetool to use your default merge tool, or you can specify the merge tool to use via git mergetool --tool=<tool>.

Most merge tools will iterate through each file with conflicts, giving you the opportunity to resolve the conflicts and save (i.e. git add them), or dismiss and revisit later.

I prefer the P4Merge tool but that is just personal preference. I encourage you to invest the time trying a few different tools to decide which works best for you. Ultimately, it will be time well spent.

Final thoughts

Encountering merge conflicts can often be intimidating since you don’t want to make inadvertent changes to the code base. But armed with the right tools, the process becomes much easier and more intentional. With knowledge of the merge base, use of the git log --follow -p -- file command, and the help of a visual merge tool you can go forth confidently when resolving merge conflicts!